Saturday, August 16, 2008

Black Bean And Roasted Corn Salad

This has always been a popular dish at our house. Its versatility allows you to use it as a salad, a side dish, or a relish. Since the recipe is big enough to feed 6 to 8 people, we normally have it on two separate nights. For the second night I add chopped avocado and diced tomato, which really makes it a whole new dish. It's easy to make and lasts up to five days in the fridge. Besides, it happens to be really pretty with all its color.

Black Bean And Roasted Corn Salad:

Ingredients:

4 ears of roasted corn, shucked

1 12 ounce can of black beans, drained

1 large red bell pepper, chopped (or use 1/2 each of yellow & red peppers)

1 large jalapeno pepper, seeded and chopped

1 medium red onion, peeled and chopped

4 cloves of garlic, minced

1 bunch of fresh cilantro, chopped

2 limes, to be squeezed over salad

2 Tablespoons of Olive Oil

1/2 teaspoon Cayenne Pepper

salt and pepper, to taste


Directions:
 
1. Clean the ears of corn, being sure to keep the husks on. Tie small pieces of kitchen twine at the top and bottom of each ear of corn, then allow to soak in water for at least 30 minutes.

2. Prepare your fire, being certain to add hickory (or your wood preference) chips just before placing the ears of corn on the grill, in order to give the corn a nice, smoky flavor.

3. I usually cook them over medium heat for 15 minutes, then turn them over for an additional 15 minutes.

4. When the corn has cooled enough to be handled, scrape the corn off the cob and place in a large bowl.

5. Add the drained black beans, red onion, bell pepper, garlic, cilantro and jalapeno to the corn in the bowl.

6. Next, add the olive oil, cayenne pepper, salt and black pepper.

7. Finally, squeeze the two limes over the contents of the bowl and toss until thoroughly mixed.
This truly goes with just about every entree I can think of. Sometimes I use it as a relish over fish. You can come up with an amazing amount of different ways to use it. As I said above, the second night I add chopped tomato and avacado, which makes it a meal in itself.

Wednesday, August 6, 2008

Grilled Lamb Chops With Rosemary

There was a time when I refused to eat lamb. No, not because I couldn't bear to eat "Lambie Pie". It was because every place I'd ever been that served it, you could smell it the minute you walked through the door. And not in a good way.


I later came to learn that only mutton has the overbearing gamey odor. A friend who lives out on a ranch and raises sheep convinced us to come to dinner one night to have some real baby lamb and I've been a huge fan ever since. So, I'm going to share my recipe for those of you who THINK you don't like lamb. It's taste is basically like a steak, only much more tender.


Grilled Baby Lamb Chops With Rosemary:  

Ingredients: 

4 Baby Lamb Chops

1 Bottle of Ken's Lite Caesar Dressing

Dash of Garlic

Salt

Ground Pepper

Fresh Rosemary, Chopped  

Directions:

1. Allow the fresh baby lamb chops to come to room temperature before grilling.

2. Coat both sides of the chops with the dressing about 20 minutes before grilling.

3. Salt and pepper both sides of the chops.

4. Cover both sides of the chops in the chopped rosemary.

5. When the coals in the grill are ready, place each chop directly over the fire. (I also like to add large hickory chips to the coals for a smokey flavor.)


6. Grill each side of the chops for approximately 4-5 minutes.

7. The Hand Method for testing doneness. Make your hand into a fist with the thumb inside. Push the fleshy part of your skin. When the meat feels like your hand, it should be medium rare.

Tuesday, July 22, 2008

Veal Marsala With Mushrooms and Red Bell Pepper

I realize there are those out there in the blogosphere who do not approve of using veal, so if you're one of those people, then you'll want to leave now and possibly never return. We eat veal along with other things that many people "Tsk Tsk." us for. I don't care. I live in Texas where everyone that has any sense eats beef... any way they can get it. I am that type of person.


Veal Marsala With Mushrooms, Red Bell Peppers & Onions:


INGREDIENTS:


4 Thinly Sliced Pieces of Veal Scallopini

1 Medium Size Red Onion, thinly sliced

4 Cloves of Garlic, crushed

1 Red Bell Pepper, sliced into thin strips

1 Egg, lightly beaten

3 Heaping Tablespoons of All Purpose Flour

1/3 Cup Grated Fesh Parmesan

Salt & Pepper, to taste

3 Tablespoons of Olive Oil

2 Tablespoons Butter1

1/2 Cup Dry White Wine

1/3 Cup Organic Chicken Broth

DIRECTIONS:


1. On a heavy chopping board, pound out the pieces of scallopini until they are very thin, almost see-through.


2. Combine the flour, parmesan cheese, salt and pepper in a large bowl or or deep pan.


3. In another bowl, lightly beat the egg and place the bowl next to the flour bowl.


4. Add 1 Tbls. of the butter and the olive oil to a large skillet and heat over medium flame.


5. Dip each scallopini in the flour mixture, immerse in the egg, then back to the flour mixture, adding each to the pan as it's ready. Cook until browned on each side, then set aside on a platter.


6. Add the other Tablespoon of butter to the pan and add the red onions, then the mushrooms, allowing them to cook for a few minutes.


7. Next, add the sliced red bell peppers and the garlic, allowing them to cook a couple of minutes.


8. Return the pieces of scallopini to the pan and cover with the veggies.


9. Add the 1/2 cup of white wine and the 1/3 cup of chicken broth and allow to simmer for about 20 minutes.


10. Serve over your favorite type of cooked pasta.

Friday, May 30, 2008

Smoke Grilled African Bird Pepper Chicken Kabobs w/ Veggies, Over Rice

This is one of our favorite meals but is often so time consuming that I just pass on making it. However, with the right amount of preparation ahead of time, it can be quite simple. Most of the preparation is chopping, which can always be done ahead of time. I always just wait until the last minute.


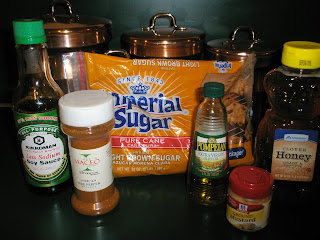
The secret ingredient and the key to the subtle heat of the marinade is called African Bird Pepper, which makes Cayenne Pepper seem like paprika. Only a very light sprinkling leaves food with a definite bite, but different from jalapeno or habanero pepper hot. I get this amazing powder at a wonderful little shop in downtown Galveston, Texas, called Maceo Spice & Imports. This place has the most wonderful items... like 12 oz. jars of imported Beluga caviar, fresh handmade cheeses, imported olive oils, fresh & dried pastas. I could go on forever. Every time we go to Galveston to visit our friends, we make a special trip downtown to The Strand to this family owned market.


INGREDIENTS:


Kabobs:


  • 3 Plump Chicken Breasts, skinless & boneless


  • 1 Pkg. Whole Mushrooms, cleaned & trimmed


  • 1 Pkg. of Small Onions, cleaned & trimmed


  • 1 Pkg. of Cherry or Plum Tomatoes


  • 1-2 Yellow Squash, washed & chopped into large chunks


  • 1/2 Red Bell Pepper, chopped into large chunks


  • 1/2 Green Bell Pepper, chopped into large chunks


  • 6 Long Metal (or bamboo) Skewers


  • Vegetable Cooking Spray


Marinade:


  • 1/2 Cup Kikkoman Soy Sauce Light


  • 1/2 Extra Virgin Olive Oil


  • 1 Tsp. Dry Mustard


  • 1 Tbls. Honey


  • Light sprinkling of African Bird Pepper


  • Salt & Pepper, to taste


DIRECTIONS:


1. Trim and chop chicken breasts into desired size pieces.


2. Using glass casserole dish, combine all ingredients for the marinade and mix well using a whisk. Place chicken pieces in marinade & refrigerate for at least two hours. I usually save a little to marinade the veggies in another bowl.


3. After getting fire started, you can begin the assembly of chicken & veggies. I always spray the skewers with vegetable cooking spray, which makes removal ever so much easier. You should be done by the time the fire is ready, approximately 20-25 minutes.


4. When fire is ready, place some water soaked hickory chips on the coals.


5. Place the skewers on the grill, watching, moving & turning as needed.


6. When grilled to desired doneness, remove from fire, remove the skewers and serve over rice.


7. We also had this again the next night with fresh rice and it was even better.


8. Bon Appetit!

Friday, May 23, 2008

Risotto Cakes, Snooty Style

At my house we adore Risotto Cakes, so I often freeze half of the recipe, already shaped into cakes. Since there are just the two of us now, most of my recipes are too big for us, so I freeze a lot of things. These cakes freeze amazingly well. The first time I made these I dipped them in Mashed Potato Flakes to coat both sides. We later decided that was entirely too decadent. That said, here is my recipe for them:


Risotto Cakes:


Ingredients:


1 Cup Arborio Rice (good for lowering cholesterol)

4 Cups Chicken Stock

5 Garlic Cloves, pressed

1 Cup Red Onion, finely chopped

3 Tablespoons Butter

2 Tablespoons Extra Virgin Olive Oil

1/2 Cup Dry White Wine

1/2 Cup Grated or Shredded Parmesan Cheese, fresh

2 Tablespoons Chopped Fresh Parsley

Sea Salt & Pepper, to taste


Directions:


1. In a medium saucepan melt 2 Tbls. of the butter and add the olive oil. Saute' the onion & garlic over medium heat until onion is translucent.


2. Add the rice and mix well to coat. Stir the mixture over heat, pan frying for one minute, or until you smell the fragrance.


3. Add wine & allow to evaporate, then add one cup of the chicken stock. Simmer, stirring occasionally until all liquid has been absorbed.


4. Continue adding chicken stock by 1/4 cupfuls, stirring occasionally.


5. When rice is cooked (approximately 20 minutes), add the remaining one Tbls. of butter, parmesan cheese and parsley. Stir vigorously.


6. Allow mixture to cool for an hour or so. You can use the refrigerator to do this, but I just set it on the counter, covered in plastic wrap, under the ceiling fan, which works quite well.

7. When ready to cook the cakes, shape a fistful of the mixture into small patties.


8. Be sure that your oil is hot enough or they will just soak up all the oil. I usually start this when the oil is just beginning to smoke.

9. Brown on each side for about 4 to 5 minutes, or until the cakes reach desired color.

10. Drain risotto cakes on paper towels and keep warm in the oven until ready to serve.

11. Sprinkle a little shredded or grated Parmesan over the tops. They are also great served with Hollandaise Sauce.

Wednesday, May 21, 2008

Almost Homemade Pizza

When I've got leftovers and want to make a quick pizza, I make this recipe. I call it:

AlmostHomemade Pizza
Ingredients:
1 Package of Pillsbury Pizza Crust
1 Can of Diced Tomatoes
1 Can of Small Artichoke Hearts
1 Small can of sliced black olives
1 Package of Grated Mozzarella
1 Package of Italian Style 6 Cheese Grated Cheese
1/2 Pound of Ground Sirloin, browned
1 Onion, chopped
1 Package of Fresh Mushrooms, sliced
1 Tablespoon Oregano (dried)

When I make this recipe, it makes enough for two large VERY thin pizzas. The night before we had the pizza, I made hamburgers and since there are only two of us, we only used half of the pound of ground sirloin that I'd bought. So, I went ahead & browned the meat in a skillet, to use the next night on the pizza. When I make the two pizzas, we eat one that night and freeze the other one to be eaten a couple of days later, usually on the weekend.
Directions:


1. Remove pizza dough from carton and cut in half. Roll out each piece of pizza dough on 2 cookie sheets (or pizza pans) and begin working it & stretching it thinner & larger.


2. Poke holes all over each pizza with a fork, then place in a 350 degree oven for 6 to 8 minutes, or until just partially cooked. Remove from oven and set aside.

3. While you're waiting, you can lightly saute the mushrooms for a minute or two, but this step can be skipped if you prefer.

4. Empty contents of can of tomatoes into a food processor, add the tablespoon of oregano and process until smooth.


5. Using a tablespoon, spread tomato sauce evenly around each of the pizzas.


6. Now add a light layer of the 6 cheese mixture to each pizza.


7. Sprinkle the ground sirloin evenly over both pizzas.


8. Next, sprinkle the chopped artichoke hearts evenly over both pizzas, then repeat process using the black olives, the chopped onions, and the lightly suateed mushrooms.


9. The last ingredient to go on is the cheese, which you can put on as much or as little as you like. Since I seldom ever measure anything, I can only tell you that I normally use about 1/2 of each package of cheese.


10. Cooking the pizza is the tricky part. I usually set the oven to 400 degrees and bake it for approximately 8 or 9 minutes. Then, I turn the oven to Broil and cook for an additional 8 to 10 minutes at the same temperature, but you kind of have to stand there & watch it closely so that it doesn't burn. Unless, of course, you like it that way.