Tuesday, February 2, 2016

Pan Fried Duck Breasts With Orange Glaze

Even though we live in a city of over 200,000 people there are very few upper end eateries aside from the various country clubs. Therefore we spend plenty of money on dining when we travel to other places. When at home we seldom eat out because it makes us both angry about paying ridiculously high prices for below standard food and service. Outback is not an upper end steakhouse chain, people!

Mexican restaurants abound here. There is practically one on every other block, often right next door to one another. However, Mexican food will make you fat if that's all you eat. There. I said it. And it's true. Once a month for us. Maybe.

We also quit eating fast food due to health concerns but we still have it once or twice a month. We can't always be expected to be good. Right?

So, since the kids no longer live at home, we have both learned to cook and we are both pretty adept. We watch food shows, we subscribe to food magazines, and we always have the internet for even more information. We have learned to be a bit daring and often shop for foods when in the Big City, that aren't available to us here. For instance, I drive to San Antonio two to three times per year just to stock up on seafood, with my ice chests in tow. I also include trips to Central Market and Whole Foods seeking other things we don't have access to here.

Our latest culinary adventure was to make the perfect duck breasts. Items like duck breasts are only stocked sporadically so when we saw them at the store, we jumped at the chance to give them a try. Out here in the wilds of West Texas it cost us a whopping $70.00 for two duck breasts so I was determined to to get them right. And right I did. They were beyond delicious and way more than either of us could eat. Still, they were worth every penny, as well as the effort.

Pan Fried Duck With Orange Glaze:

Ingredients:

2 Boneless Peking or Muscovy Boneless Duck Breasts (I used Peking duck)
Kosher Salt & Freshly Ground Black Pepper

For the Glaze:

2 tablespoons of orange liqueur (I used Grand Marnier)
1 cup fresh orange juice
1 tablespoon brown sugar
1/4 teaspoon ground allspice
2 star anise
freshly ground black pepper
1 teaspoon orange zest
2 tablespoons butter

Directions:

Using a sharp knife, lightly score the skin side of the duck breast and season with salt and pepper. Place the duck breast skin side down in a cold saute pan and place over medium heat. Cook until the duck skin is crispy, 8-10 minutes. Drain and discard the duck fat that pools on the bottom of the pan as they cook and the skin renders.

Flip the duck breasts and cook very briefly (about 30 seconds) on the other side.
Remove from pan and set aside to rest as you prepare the glaze.

Take the pan that you cooked the duck breast in and pour out the fat, wipe out any excess salt and discard. Away from the heat, add orange liqueur to de-glaze then return to heat and add orange juice, spices and sugar. Reduce for 2-3 minutes until thickened and rich. To the pan add orange zest and cold butter. Swirl as it melts and serve with sliced duck breasts.
 
 I served the duck with a brown & wild rice medley and sugar snap peas, which was the perfect combination. Cheers! (Recipe is from Top Chef University.)

This recipe is thanks to Top Chef University Online. They offer a great online cooking course but it is lengthy.

Friday, October 30, 2015

Salmon Fillets, Brussel Sprouts and Onion Baked In Parchment Bags... Easy Peasy!

I went to see some good friends in San Antonio and when I arrived they had THIS scrumptious, easy-peasy dinner ready for me. I had never used parchment bags before but they convinced me I had been missing plenty. The best part about this meal is that you can prepare it ahead of time and stick it the fridge until later, when you're ready to bake. Same day, of course. It's almost as good as having the evening off from cooking.


As I left their home with recipe in hand, I couldn't wait to get home and try my own hand at this quick and easy recipe. My friends even gave me a stack of parchment bags to start me off. On my drive home I realized the possibilities of what I could bake in the bags, was endless.

So, let's get you started, shall we?

Salmon Fillets, Brussels Sprouts And Onions:

Ingredients:

Salmon fillets - two

2 parchment bags

Brussels Sprouts - use desired amount, halved

slices of onion - use desired amount

extra virgin olive oil (or slices of butter)

Directions:

1. For each bag, scatter sliced onions around the bottom of the bag.

2. Place salmon fillets on top of onions.

3. Next, scatter the halved sprouts on top of the fillets and throughout the bag.

4. Drizzle the olive over the top of the pile.

5. Salt and pepper to taste.

6. Fold closed the opening as tight as possible. I just use staples.

7. Bake in preheated 400 degree oven for 20 minutes.

8. Open bags and transfer to plates. Serve with rice or bread.

Sunday, September 13, 2015

Perfect Beef Tenderloin, Every Time...

Since the holidays are closer than you think, I thought I'd go ahead and re-post my perfect beef tenderloin recipe.

When my mother-in-law was still alive we always went to holidays at their house and she was a
superb cook. Unfortunately, she never shared her secrets to roasting the perfect turkey with me, then we lost her to cancer before I was ever able to get the chance to get them out of her.


Since then, we simply decided that we'd have Kathy Vegas' dry brined turkey at Thanksgiving and we'd have beef tenderloin at Christmas. It works for me. The sides are basically the same, but we turn to the wonderful beef tenderloin for our main course at Christmastime. It's simply Heavenly!


This is my family's favorite thing to eat, ever, and it is the easiest recipe ever. We call it the "30-30-30 Method".  


The beauty of this recipe is that once you learn it, you'll never forget it. It NEVER fails as long as you stay within the 3 to 5 pound range, on the tenderloin. It basically only works with tenderloins, weighing somewhere between 3 and 5 pounds. Yes, I know it sounds crazy, but it's true. I dare you to challenge me on this. Truly.


Ingredients:

1 Beef Tenderloin (I call ahead of time and ask them to prep it for me, trimming the excess fat and tendons.)

1 Bottle of Pickapeppa Sauce (I usually use about 1/3 of the bottle on a good sized tender, spreading it on with a basting brush)

Garlic Powder

Black Peppercorns, freshly ground

1 Sheet of Aluminum Foil


Directions:


1. Preheat oven to 350 degrees. Spread the sauce and spices on the tender.

2. When it's heated place the tenderloin on the foil into the center of the oven and bake for exactly 30 minutes. DO NOT OPEN DOOR AT ANY TIME.

3. At the end of 30 minutes of cooking, turn the oven off. DO NOT OPEN OVEN DOOR AT ANY TIME.

4. Set timer for another 30 minutes. DO NOT OPEN OVEN DOOR AT ANY TIME.

5. At the end of the second 30 minutes remove the tender from the oven and allow it to coast for an additional 30 minutes at room temperature.

6. At the end of the third 30 minutes you may slice the tender and serve. You will have a variety of MED RARE to MED.

Enjoy the compliments!

Tuesday, June 17, 2014

Veal Parmigiana Atop A Nest Of Pasta With Steamed Artichokes & Curry Mayonnaise

This is one of our favorite meals and we have it at least once a month. Sometimes we have the artichokes cold and sometimes we eat them hot. Whatever floats your boat, people.

At any rate, here is the recipe:

Veal Parmigiana:

Ingredients:

Veal Scallopini, pounded to very thin with a meat cleaver
1/2 cup flour
1/4 cup grated parmesan
1 egg, beaten
1-1/2 Tbls. olive oil
1 Tbls. butter

1 red onion, sliced in fairly small pieces

1/2 green bell pepper
red wine, to taste
homemade mozzarella, sliced


Directions:

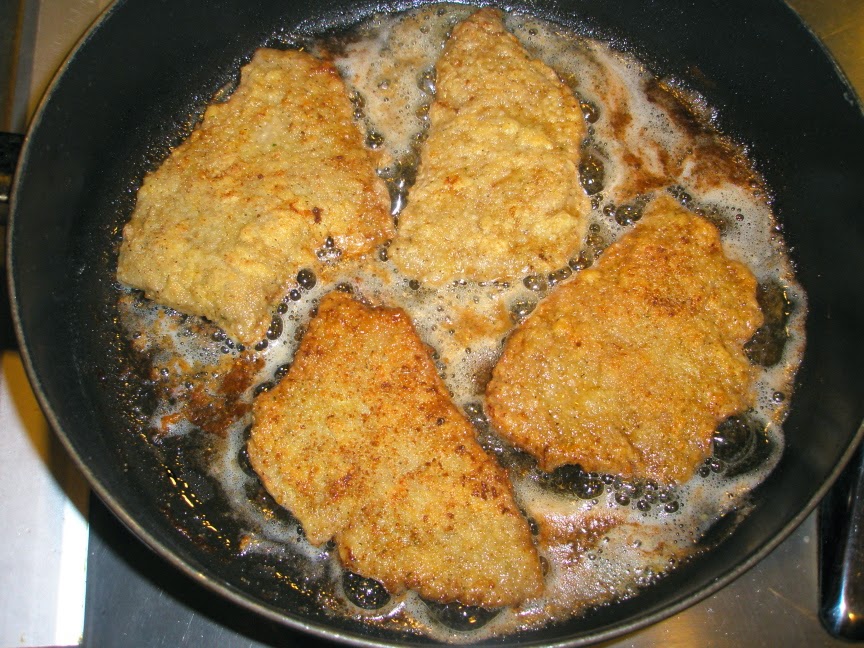
1.  Pound veal to very thin but not torn to holes. Set aside.

2.  In one bowl, beat egg and set aside.

3.  In another bowl combine flour, salt & pepper. Set aside.

4.  Place Parmesan in yet another bowl and set aside.

5.  Arrange bowls accordingly since you will be using the flour first, egg second, and Parmesan third.


6.  Once ready to begin, dip each piece of veal first into the flour, then into the egg, and lastly the Parmesan.

7.  Place in medium heated pan coated with a thin layer of olive oil and butter. Pan fry until lightly browned on both sides.

8.  Remove pieces of cooked veal and place in oven on warm.

9.  Saute sliced onions until just transparent using the leftover oil/butter. Add green bell pepper and saute for a few more minutes.


10. Add red wine and stir. (I usually use 1/2 cup.)

11. Scrape aside and add the veal cutlets, scraping it back on top of the veal pieces.

12. Now add a slice of handmade Mozzarella to each veal piece. Cover with lid and allow to simmer a few more minutes.


13. Serve atop a bed of thin spaghetti along with steamed artichokes & curried mayonnaise.

14.  ENJOY!


The trick to making this so delicious is to use fresh Bufala mozzarella, which is as creamy and as tasty as mozzarella gets.


Using fresh pasta is always best, but I simply used dried spaghetti here. Some days just simply don't allow the time to do homemade, but don't let that stop you from making a tasty, simple meal like this.

Tuesday, November 12, 2013

Homemade Fresh Vegetable Soup...

Today we're experiencing our first real cold snap of the season and hubby requested homemade
veggie soup. It's supposed to be in the upper 20's tonight, so after a trip to the market I got it started. To me, there is nothing better than the smell of a savory homemade soup simmering on the stove all day. This is enough for about 6 to 8 people.

You can easily add or subtract any veggies you choose as well as the broth amount. It's all up to the person making it, right? Chop size of veggies to your own preference. I like to make them small enough to get a little of everything in a single bite, but that's just me. So, what do you say? Let's get this party started, shall we?

INGREDIENTS:

2    tablespoons extra virgin olive oil
2    medium size yellow onions, chopped
2    large white potatoes, chopped
3    stalks of celery (use 4 if they're skinny), chopped
4    carrots, peeled and chopped to size preference (use more if baby carrots are used)
4    garlic cloves, minced
1    (4 cup) carton of beef (or chicken) broth, low sodium
1    large can of diced petite tomatoes
1    12 oz. can of tomato sauce
1    bunch of fresh green beans, chopped to bite size
1    container of fresh mushrooms, chopped
1/2 bunch of parsley, minced
2    bay leaves, whole
      salt & pepper, to taste

DIRECTIONS:

1.   Coat bottom of stock pot with the olive oil and saute onions and celery for a few minutes over medium heat or until they start to get transparent.

2.   Add minced garlic then stir for a minute. Add the potatoes and carrots, stirring for another couple of minutes.

3.   Next, add the canned tomatoes, tomato sauce, broth and bay leaves. Bring to a boil and simmer for approximately 2 hours. Stir gently occasionally. Season to taste with salt & pepper.

4.   When the soup is nearly finished cooking add the chopped mushrooms, diced green beans, and minced parsley. Simmer for an additional 15 to 20 minutes

5.   Remove bay leaves and serve with piping hot corn bread and butter.

6.   Enjoy with a nice glass of red or white wine! Personally, I like a good Malbec red wine. I haven't met one I didn't like, yet.

Thursday, June 27, 2013

Bruschetta Topped With Creamy Quail Eggs... You Will Love It!

We don't have quail eggs available to us where we live in West Texas. We just like to shoot the adult quail and eat them. So when I was in San Antonio the last time visiting friends, I made my favorite trek to Groomer's Seafood. There, I found an abundance of fresh quail eggs. I might have even squealed with delight just a little.

In the days since I first started going to Groomer's, they weren't quite so sophisticated as they are these days, but they're still fun. And, they have fresh quail eggs that are simply divine. The creaminess of the quail eggs is like nothing else I've ever tasted. I might feel a teensy bit guilty for eating sweet little quail eggs, but maybe not.

Soooo... In trying to decide how I was going to spotlight these lovely little eggs at home, I decided they would be the perfect accompaniment served over delicious homemade Italian Bruschetta. I don't know where my flashes of brilliance come from, but I allow them as much room as they need. (wink!)

This was one of my very best. Please enjoy!

Italian Bruschetta Served With Sunny-Side-Up Quail Eggs On Top:

INGREDIENTS:

4 - 1 inch thick pieces of sourdough bread
1  - tablespoon of butter
1  - tablespoon of extra light olive oil

1  - small can of sliced black olives
1  - green bell pepper, chopped
1  - yellow bell pepper, chopped
1  - red onion, chopped
fresh basil leaves, lightly chopped, to taste
1  - tablespoon Balsamic vinegar
2  - tablespoons of extra light virgin olive oil
1  - fresh, large tomato, chopped
fresh mozzarella cheese, chopped in small pieces
Kosher salt and black pepper, to taste
 
1  - dozen quail eggs (six for each of the two servings)
2  - tablespoons of butter

DIRECTIONS:

1.  Place olive oil & butter in saute pan and brown both sides of bread lightly. Set aside.

2.  Combine next 10 ingredients in a medium to large bowl. Set aside while the flavors have a chance to meld.

3.  Cook quail eggs (6 at a time) in a saute pan coated with butter, as you would sunny-side-up eggs. However, don't cook them too long or you'll miss the delicious, oozing egg.

4.  Quickly place the cooked eggs atop the beautiful bruschettas that you've already prepared.

5.  Try to not make pleasure noises while gobbling it...

6.  We like to just have this for dinner but it might work for an appetizer as well.

Sunday, February 3, 2013

Thin & Crispy Pizza w/ Store Bought Crust

In my opinion, pizza can be a very delicious AND healthy meal, when you make your own at home. I never have time to make a crust from scratch, so I'm always on the lookout for a good, quick crust to use.


The crust is actually made by HEB grocery store and comes in packages of two pizzas. It is so amazing.


Living in Texas, we have a wonderful chain of grocery stores called HEB (Henry Butts ring a bell?), which offers us many new and lovely things we'd otherwise never see. For that, we thank them profusely.


For about the last 6 months, they've been carrying this great, easy, ready-made pizza crust that is as thin as it gets. It's really quite good and allows us to make our pizzas to our personal preferences.


We used to be huge fans of Pizza Hut's thin & crispy, but the last 3 times we've ordered the pizza delivered, it has arrived not fully cooked AND it was stuck on the new parchment paper they are now including in their pizza boxes. We had to scrape the crust off the paper with a metal spatula.


We also like to use fresh tomatoes and freshly made mozzarella as well as chopped artichoke hearts and sliced black olives.


For really authentic flavor and even cooking we also like to use a preheated pizza stone, which allows the pizza to cook to perfection inside 15 minutes.

Sunday, November 18, 2012

Dry Brine Roasted Turkey... Via Kathy Vegas


For the last few years all I see are people swooning over the wet-brining of this meat or that, or the fried turkeys, which each sounded like a big pain in the pa-tootie to me. Then, I met a new blog friend on Foodbuzz who used to be a professional chef. Not only has she changed the way I cook, but she has also rocked my world with this Dry Brine recipe for turkey. She goes by kathyvegas on Foodbuzz and she lives in THE Las Vegas (as opposed to Las Vegas, New Mexico...). Her blog is called Las Vegas Food Adventures and she is an amazing chef who just so happens to give excellent restaurant reviews as well. She's innovative, daring, imaginative, and explains her process to the T on each and every recipe. I am so totally in awe of her expertise and I want to be just like her! (Okay that sounded just a little stalker-ish. Sorry!)


I'll admit I was a bit scared to try something new on a major holiday. However, she posted a recipe for Dry Brine Roasted Turkey, stating that she really doesn't even like turkey but she will eat it this way any time. I just wondered how could I get a better recommendation than that? I was sold. So I decided to go with it for Thanksgiving 2009. We've tried other ways of cooking our turkey since then, but nothing else even compares. So, we're doing the dry-brine again this year.

I have to tell you that my dearest hubby was breathing down my neck and watching everything I was doing like a hawk. That makes me crazy, but this time I was ready to prove him wrong for once, so I just kept shooing him out of my way, keeping to my recipe from Kathy.

He even went so far as to go to the Butterball web site and print out a chart that showed how long to cook a turkey per pound, which I totally ignored, as I stuck to Kathy's recipe. I was only a tiny bit worried, but Kathy had even emailed me with a few extra tips, so I was locked in on the Dry Brine. The only thing I did different was stuff the cavity of the bird with chopped fresh garlic, celery and onion, which also lends a nice flavor to the meat.


I cannot begin to tell you how easy the recipe is. I've never had it so easy in my life. And, the biggest surprise of all? Kathy said the internal temperature deep within the thigh (and not touching the bone) should be 165 degrees. The Butterball web site said it should be 185 degrees internal meat temperature. That is the 20 degrees that makes the difference between dry white meat and succulent white meat. Huh? Who knew? I am telling you the absolute truth when I say it was truly the most succulent turkey I've ever had the pleasure of eating in my entire life. Best of all? I MADE IT! First time ever that I received (sincere) compliments on my turkey. I wasn't even sure how to react because I was in something like a haze of euphoria. It was quite a heady feeling.

And, this is the most excellent recipe I will ever give you.


Dry Brine Roasted Turkey By KathyVegas:

"I’m already on record as a pumpkin pie hater, I might as well publicly announce I feel the same way about turkey. I understand how people are inspired by the look of a gargantuan perfectly browned Norman Rockwell bird as the centerpiece of a holiday meal. I just don’t understand how so many folks actually like the taste and general lack of moistness of the darned things. I much prefer roasting a large capon (always juicy and tender), but cave into peer pressure every couple of years and give turkey another try.

I’ve had turkey prepared in every way imaginable-injected & deep fried, smoked, crock-pot cooked, spatchcocked & grilled…and with every imaginable spice combo on earth. To date, I’ve only found one way to make a turkey palatable and that would be brining. But not wet brining in an unwieldy vat of salt water, but dry brining.

Brining works this way…soaking in a salt water solution draws the moisture out of the bird initially but then is reabsorbed into the cells of the flesh, seasoning and moisturizing during the process. The salt works to make the turkey retain water as it roasts. The scientific name for this is diffusion and osmosis. I also feel that dry brining improves the texture of the meat (unlike wet brining). Dry brining is easier and far less messy than the current darling of cooking shows, wet brining. The recipe and dry brining technique are straightforward. This is the method I use and I highly recommend it (unless you are roasting a nice plump already juicy capon):


Dry Brine Roasted Turkey:

For a 12 pound “natural” whole thawed turkey (not Kosher which is already salted) you will need
½ cup kosher or sea salt

2 tablespoon granulated white sugar (optional but definitely not needed-seasonings such as garlic, herbs, spices, citrus peel, wine, etc.)

Thaw, wash and dry the turkey with paper towels well. Combine the salt and sugar and gently work about a teaspoon under the skin of each breast and thigh as far as possible without tearing the skin.  I carefully use the blunt end of a wooden spoon handle to gently separate the skin from the meat to reach way under the skin. Rub another teaspoon all over the outside of the bird and evenly sprinkle the remainder in the cavity.


Place on a rack, loosely covered with plastic wrap in a large pan (the pan you will be roasting the bird in will do) for 12-24 hours.

To roast, rinse the bird well inside and out under cool water to remove the excess salt and dry the skin and cavity very well with paper towels. The dryer the skin, the crisper the skin will become. Tie the legs together with kitchen twine and tuck the tips of the wings under the bird. Rub the bird all over with softened butter. Place the bird in a 425 degree oven on a rack and roast for 30 minutes.

After the first 30 minutes, lower the heat to 350 degrees and baste every 30 minutes with additional butter or pan drippings for approximately 2-3 hours or until the internal temperature taken in the thickest part of the thigh registers 165 degrees on a meat thermometer;  juices from inside the cavity will have no trace of pink. Don’t rely on that pop-up thermometer that comes with your turkey.

Remove the turkey from the oven, place on a large platter, uncovered, to rest while you make gravy with the pan drippings. Resting allows the meat juices to redistribute and makes carving easier."

I sincerely hope that if you try this method, it fulfills all your dreams of the perfect Thanksgiving turkey. Have a wonderful Thanksgiving! 

Saturday, August 25, 2012

Austin Dining Review.... "The Mighty Cone" Food Truck

Mr. Snooty and I just returned from visiting our offspring in Austin and it was quite the culinary trip indeed. So, first of all, I must tell you about our experience with the first food truck we've ever actually been to.


The Mighty Cone. Owned and operated by Hudson's On The Bend. I'm now a total fan and will make a special trip to Austin just to sample, once again, their goodies.


Located on South Congress (the totally trendy foodie area), The Mighty Cone delivers the most healthy fast food I've ever had the opportunity to devour. Can I just say YUM? I admit that I was making noises like, "Mmmmm", "Ohhhh", "Ahhhhhh", among other sounds of foodie bliss. We sampled their panko fried chicken, panko fried avocado, with an exquisite cole slaw wedged in between, as well as a drizzle of the most dazzling sauce ever. They also make their own (spicy) ketchup, which they serve with their Skinny Fries.


The whole experience was just a delicious adventure that I won't soon forget.

Thursday, July 26, 2012

Uchiko In Austin Is To Swoon For.... A Review

We recently went to Austin to visit our daughter while she was in Austin doing a coveted law school internship. Since we always try to make plans for only upper end dining when out of town, she suggested that we make *rezzies* (her word) at the spin-off of Uchi, the smoking hot place to be, Uchiko. We jumped at the chance and dined there on Saturday night. What a magical night it was!


After visiting our daughter several times during her California Experience, we totally fell for the eateries with *open kitchens*. So, I was thrilled to see that Uchiko had an *open kitchen* concept. That's right. We don't get out much. I should also admit right here that I'm not a huge sushi fan unless I'm at Katsuya in West Hollywood in LaLa Land or now, Austin's Uchiko. Frankly, just the thought of eating excellent sushi in West Texas (The Permian Basin) just makes me howl with laughter or seriously want to hurl.


Although we had perused the menu on line before our dinner, we had a server who was so knowledgeable and well-spoken, that we followed her advice without question. Admittedly, our daughter has a friend (one of my faves - who also has a degree in English from NYU... I'm sure he's also writing the Great American Novel in his spare time) who is *in training* for wait service at this point, at Uchiko. Therefore, he wasn't able to be our server that night. Bummer. Luckily, he steered us to the right server and everything just unfolded from there.


I'm pretty sure I'd have to have my master's degree in something just to tell you what we ate. Yes, it was that indescribable. Speaking Japanese would help just in case you happen to have that in your resume. Naturally, I embarrassed the whole family by taking pictures of each and every dish (I think.). There were so many coming to us in succession that it was mind boggling. However, we never once felt as if we were being rushed. They never interrupted us or hovered too much, which are pet peeves of mine. The service, the food, the saki. It was all an experience rather than just being a meal. Something worth lingering over.


I truly give Uchiko my highest recommendation for any restaurant ever, but it does come at a price. I could have gotten a new Louis Vuitton bag instead, but I definitely preferred the enchanting dining experience with my family. The freshness of the food as well as the presentation were dazzling. Seriously.


Since this relatively new Austin restaurant is currently so hot, you must book rezzies way ahead of time. I can assure you that every single server can determine what would be best for those dining at your table after asking a few pertinent questions. It's why they hire only the best, top rated staff in Austin which is what makes it so unique.


All of the best restaurants in Austin hire nothing but the brightest but Uchiko has the cream of the crop. Do not pass up the opportunity to dine there, if given the chance. You can thank me later. Expect to pay at least $500.00 for a party of 3. It's worth every penny....

Tuesday, May 1, 2012

How To Tell If Your Oven Is Working Improperly...

Some of us often have to be slapped upside the head before we see what is before our eyes. For the longest time I thought I was cooking everything at the wrong temperature because things kept burning on top. I mean, really. How stupid is that? Don't answer. I realize now how naive it was. I must have made at least 20 meals like this before I finally realized my wonderful, vintage Thermidor double ovens had finally bitten the dust. It was a death I mourned almost as if it had been a relative, as we'd had them for 23 years. I knew when I had to bid them adieu that I wouldn't be getting new Thermidor ovens. Too expensive these days and we have too many repairs and updates going on at the moment as it is. Besides, Mr. Snoots can't do anything to help with a renovation of any kind. Frankly, he's not ALLOWED to attempt to do anything with power  tools or remodeling, for his own safety as well as the safety of our home.


Our next annoyance was finding a double oven that would be the right size to fit in the former space, which so didn't happen. Times have changed and so have appliances. Ovens have gotten smaller and washers/dryers have gotten bigger. God forbid that we might have to remodel something around here. We were able to locate a double oven that fit the width dimensions, but not the length dimensions, which means we still  have  an entire shelf under the oven that has no cabinet cover. It actually looks ridiculous at this point.


However, I've strayed far from the point of this post, so I'll get back to it now.When I kept burning everything I made on the top side, I finally realized that I needed new ovens. Apparently, I'd been cooking with improperly working ovens,  I'd forgotten how to cook like a normal person. The only working coils were the ones on the top, thus the reason everything was getting so dark on top.


I was used to things turning out like this:


And this:


And this:


So, when you start burning everything in your ovens, you might want to have a pro check it out instead of second guessing your own cooking expertise. It might not be you. 


We ended up purchasing the GE double ovens because they were the only ones that we wouldn't have to totally rebuild the cabinets around them, not because they were the best. I would certainly have preferred stainless steel to go with our other appliances. I like these but the bottom oven is not self-cleaning, which I consider to be a pain in the neck, even though we try to be careful about what we cook in the bottom oven. But hey, I'm not burning everything anymore, so I guess I shouldn't care.....